Is your window air conditioner struggling to keep your space cool and fresh? Over time, these essential units accumulate dust, dirt, and even mold, which can severely impact their efficiency and the quality of the air you breathe. Neglecting regular maintenance can lead to higher energy bills, diminished cooling power, and potential health concerns. This comprehensive guide will walk you through a safe, step-by-step process to deep clean your window air conditioner at home, ensuring it runs efficiently and provides crisp, clean air throughout the seasons.
An Overview of Window Air Conditioners and Their Importance
A window air conditioner is a self-contained unit designed to cool a single room or area by drawing in warm air, removing heat and humidity, and then returning cooler air. These units typically consist of a compressor, condenser coil, evaporator coil, fan, and air filter, all housed within a compact casing that fits into a window opening. While they offer a convenient and often cost-effective cooling solution, their exposed nature means they are constantly exposed to external elements and indoor pollutants.
The history of air conditioning dates back to the early 20th century, evolving from large industrial systems to the more accessible household units we know today. Window units became popular for their ease of installation and ability to provide localized cooling. Modern window air conditioners come in various capacities and feature advancements like inverter technology for energy savings, improved filtration systems, and smart controls, making them more efficient and user-friendly than ever before. Understanding the basic components of your unit is the first step toward effective maintenance.
Why Regular Cleaning of Your Window Air Conditioner Matters
Regular cleaning of your window air conditioner is not just about aesthetics; it’s a critical aspect of home maintenance that yields multiple benefits. Many homeowners overlook this task, only realizing its importance when performance declines or unpleasant odors emerge. Consistent cleaning ensures your unit operates at its best, providing a comfortable and healthy indoor environment.
Improved Efficiency and Performance
|
Our Picks for the Best Air Conditioner in 2026
As an Amazon Associate I earn from qualifying purchases.
|
||
| Num | Product | Action |
|---|---|---|
| 1 | Windowless Portable Air Conditioners with Remote, Ventless Ac Unit Ductless Air Cooler,Hoseless Quiet Evaporative Oscillating Swamp Cooler,12H Timer & 4 Ice Box for Room Indoor Outdoor Office Bedroom |

|
| 2 | Portable Air Conditioners, 3-IN-1 Swamp Cooler, Evaporative Air Cooler,Remote & Touch Control, 90°+90° Oscillation,LED Screen, Air Coolong Fan for Outdoor Indoor |
|
| 3 | Dreo Tower Fan for Bedroom, 2026 Upgraded DC Motor, 28ft/s High Velocity, 20dB Ultra Quiet Standing Fan, 8 Speeds 4 Modes, 90° Oscillating Bladeless Fan for Indoors, Floor Fans with Remote, Black |
|
| 4 | Windowless Portable Air Conditioner, 24.4" Small Evaporative Air Cooler for Room No Window, 3-Speed Settings, 4 Modes, 7H Timer, Remote Control, 4 Ice Packs, Quiet AC Unit for Bedroom, White |
|
| 5 | Midea 5,000 BTU EasyCool Small Window Air Conditioner - Cool up to 150 Sq. Ft. with Easy-to-Use Mechanical Controls and Reusable Filter, Perfect for Small Bedroom, Living Room, Home Office |
|
| 6 | 24" Windowless Portable Air Conditioner, 15H Timer & 120°Oscillation, 3-IN-1 Portable AC Unit with Remote, 2-Gal Tank, 3 Modes & 3 Speeds, Ultra-Quiet Ventless Swamp Cooler for Home Office, Off |
|
| 7 | BLACK+DECKER Window Air Conditioner 10000 BTU, AC Window Unit Cools Up to 450 Square Feet, Window AC Unit with Remote Control, 3 Cooling Speeds and Fan Only Function, BD10WT6, White |
|
| 8 | Dreo Tower Fan for Bedroom, 42 Inch 120° Oscillating Fan, 25dB Quiet DC Motor, 28ft/s Velocity Bladeless Standing Fan with 12 Speeds, 4 Modes, 12H Timer Cooling Fans for Home, Living Room |
|
| 9 | SereneLife Portable Swamp Cooler Air Conditioner - 2500 CFM Airflow, 8 Gallon Water Tank Portable Evaporative Air Cooler for Room & Outdoors, WiFi, Humidifier & Fan Modes, Ice Packs & Remote Included |
|
| 10 | Evaporative Air Cooler with Remote & Timer, 2200+ CFM Portable Fan That Blows Cold Air for Large Room, Home Office, Bedroom - 2.1Gal High-Capacity Tank, 3 Modes, Whisper Quiet 30dB & Sleep Mode |
|
A clean window air conditioner can significantly improve its operational efficiency. When coils, filters, and fans are clogged with dust and debris, the unit has to work harder to achieve the desired temperature. This increased effort translates directly into higher energy consumption and, consequently, steeper electricity bills. Regular cleaning allows for optimal airflow and heat exchange, enabling the unit to cool your space faster and more effectively, reducing strain on its internal components.
Healthier Air Quality
The air filter in your window air conditioner is designed to trap airborne particles, allergens, and pollutants. However, a neglected filter can become a breeding ground for mold, mildew, and bacteria, which are then recirculated into your home. This can exacerbate allergies, asthma, and other respiratory issues. Cleaning removes these contaminants, ensuring that the air discharged by your unit is fresh and free of harmful particulates, contributing to a healthier living space.
Extended Lifespan and Cost Savings
Just like any other appliance, regular maintenance extends the lifespan of your window air conditioner. By preventing the buildup of dirt and grime, you reduce wear and tear on crucial parts such as the compressor and fan motor. This proactive approach can prevent costly repairs or premature replacement of the unit. Investing a little time in cleaning can save you a significant amount of money in the long run.
> “Many people don’t realize that a dirty air conditioner can consume up to 15% more energy than a clean one. Regular cleaning is the simplest way to maintain efficiency and prolong your unit’s life.” – Sarah Chen, HVAC Systems Expert
Essential Tools and Safety Precautions for Cleaning Your Window AC
Before you begin the cleaning process, gathering the right tools and understanding crucial safety measures will ensure a smooth, effective, and hazard-free experience. Cleaning a window air conditioner involves working with electrical components and potentially sharp fins, so careful preparation is key.
Gathering Your Cleaning Arsenal
You don’t need specialized equipment for most of the cleaning tasks. Here’s what you’ll typically require:
- Screwdriver: Phillips or flat-head, depending on your unit’s casing.
- Soft Cleaning Brush: For gentle scrubbing of delicate parts and dislodging dust.
- Vacuum Cleaner with Brush Attachment: Essential for removing loose dust and debris from coils and other interior components.
- Clean Cloths/Microfiber Towels: For wiping down surfaces and drying parts.
- Spray Bottle: For applying cleaning solutions.
- Warm Water and Mild Detergent: A gentle soap is sufficient for most cleaning.
- AC Coil Cleaner (Optional): Specialized cleaners can be more effective for stubborn grime on coils.
- Fin Comb (Optional but Recommended): A tool to straighten bent aluminum fins, improving airflow.
- Protective Gloves and Safety Glasses: To protect your hands from cleaning solutions and your eyes from dust or debris.
- 3% Hydrogen Peroxide or White Vinegar (for mold): Effective natural solutions for treating mold and mildew.
Prioritizing Safety: Before You Begin
Safety is paramount when dealing with electrical appliances and water. Always follow these precautions:
- Unplug the Unit Completely: This is the most critical step. Ensure the window air conditioner is disconnected from its power source to prevent electrical shock. If your unit is hardwired, switch off the circuit breaker that controls its power. Never attempt to clean a unit that is still plugged in.
- Allow the Unit to Cool Down: If the AC has been running, give it at least 30 minutes to cool down before handling any components. Internal parts can get hot.
- Avoid Harsh Chemicals: Never use abrasive cleaners, bleach, or alcohol-based solutions on your air conditioner. These can damage plastic components, corrode metal parts, or release harmful fumes. Stick to mild detergents or specialized AC coil cleaners.
- Protect Electrical Components: While cleaning, be mindful of where you spray water or cleaning solutions. Avoid directly drenching electrical wiring or control panels to prevent damage and electrical hazards.
Step-by-Step Guide: How to Clean Your Window Air Conditioner
Once you’ve gathered your tools and ensured all safety measures are in place, you can proceed with the detailed cleaning process. This guide covers each major component of your window air conditioner.
Preparing the Unit
- Disconnect Power: Reiterate that the unit must be unplugged from the wall outlet or the circuit breaker turned off. This step is non-negotiable.
- Remove the Front Cover: Most window AC units have a front panel that can be unclipped or unscrewed. Gently remove it, noting any screws or clips, and set it aside. You will clean this separately.
- Place a Towel: Lay a towel or tarp underneath the unit to catch any dripping water or debris during the cleaning process.
Cleaning the Air Filter
The air filter is your unit’s first line of defense against dust and allergens.
- Remove the Filter: The air filter is typically located directly behind the front cover and can be slid out or lifted.
- Vacuum Loose Debris: Use a vacuum cleaner with a brush attachment to gently remove any loose dust and dirt from the filter surface.
- Rinse and Wash: For a deeper clean, rinse the filter under running warm water (in a sink or with a garden hose). If there’s stubborn dirt or a musty smell, apply a mild detergent, gently scrub with a soft brush, and continue rinsing until the water runs clear.
- Dry Completely: Shake off excess water and allow the filter to air dry completely in a well-ventilated area, away from direct sunlight. A wet filter can promote mold growth when reinstalled.
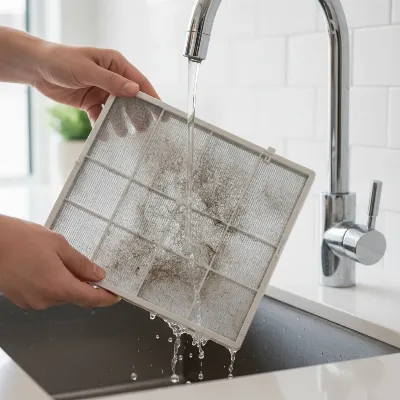 A person carefully cleaning a dirty window air conditioner filter under running water to remove dust and debris
Tackling Evaporator Coils and Fins (Interior)
The evaporator coils, located behind the filter, are responsible for cooling the air.
- Vacuum Coils and Fins: With the filter removed, use your vacuum cleaner with a soft brush attachment to gently remove surface dust and debris from between the aluminum fins of the evaporator coils. Be very gentle to avoid bending the delicate fins.
- Apply Coil Cleaner (Optional): If using a specialized AC coil cleaner, follow the manufacturer’s instructions. Alternatively, you can spray the coils with a mild detergent solution (diluted in a spray bottle) and let it sit for a few minutes to break down grime.
- Gentle Rinse: Lightly spray the coils with clean water from a spray bottle to rinse off the cleaning solution. Avoid saturating the electrical components.
- Straighten Fins: If you notice any bent fins, carefully use a fin comb or a thin, blunt object (like a butter knife) to straighten them. Straight fins improve airflow and cooling efficiency.
Addressing the Condenser Coils (Exterior)
The condenser coils are usually located at the back of the unit, facing outwards.
- Access the Exterior: This may require pulling the unit partially out of the window or accessing it from outside if safe to do so.
- Clean Condenser Coils: Similar to the evaporator coils, use a vacuum with a brush attachment to remove debris. You can also use a garden hose to gently spray water through the fins from the inside out, dislodging dirt. Avoid high-pressure sprays.
- Apply Coil Cleaner: If the condenser coils are particularly dirty, apply an AC coil cleaner according to product instructions, then rinse thoroughly.
Cleaning the Drain Pan and Hose
The drain pan collects condensation, and a clogged drain can lead to leaks and mold.
- Locate Drain Pan: The drain pan is at the bottom of the unit.
- Remove Debris: Use a wet/dry vacuum or a cloth to clean out any standing water, slime, or debris from the pan.
- Flush Drain Hole/Hose: Some units have a drain hose. If accessible, detach it and pour hot water mixed with a mild detergent or a little bleach solution (if compatible with your unit’s materials and used sparingly) through it to flush out clogs. Alternatively, use a hose with gentle pressure. Ensure the drain is clear.
Wiping Down the Casing and Reassembly
With the internal components clean, it’s time to finish up.
- Clean Front Cover and Casing: Wipe the removed front cover and the exterior casing of the unit with a cloth dampened with warm, soapy water. Rinse with a clean, damp cloth and dry thoroughly.
- Ensure All Parts Are Dry: Before reassembling, double-check that all internal components, especially the air filter, are completely dry to prevent mold growth.
- Reassemble: Carefully slide the air filter back into its slot, reattach the front cover, and secure any screws.
- Restore Power: Once everything is back in place and dry, plug the unit back into the power outlet or switch the circuit breaker on.
Common Cleaning Mistakes to Avoid
Even with the best intentions, it’s easy to make mistakes during air conditioner cleaning that can compromise safety or effectiveness. Being aware of these common pitfalls can help you avoid them.
Overlooking the “Unplug First” Rule
The most critical mistake is attempting to clean the unit while it’s still connected to power. This poses a severe risk of electrical shock. Always, without exception, unplug your window air conditioner before you begin any cleaning or maintenance. If it’s hardwired, ensure the corresponding circuit breaker is switched off.
Using Harsh or Abrasive Cleaners
While powerful cleaners might seem appealing for tough grime, chemicals like bleach, ammonia, or abrasive scrubbing pads can damage delicate components, corrode metal fins, and even release toxic fumes. Stick to mild detergents, specialized coil cleaners, or natural alternatives like hydrogen peroxide and white vinegar for mold.
Not Allowing Parts to Dry Completely
Reassembling a window air conditioner with damp components, especially the air filter, creates an ideal environment for mold and mildew to flourish. This not only negates the benefits of cleaning but can also introduce unhealthy spores into your home. Always ensure all parts are thoroughly air-dried before putting the unit back together.
Neglecting the Drain Pan and Condenser Coils
Focusing solely on the air filter and evaporator coils is a common oversight. A clogged drain pan can lead to water leaks and unpleasant odors, while dirty condenser coils (the exterior part) significantly reduce the unit’s ability to dissipate heat, leading to decreased efficiency. Thoroughly clean all accessible components.
Tips for Efficient Air Conditioner Use After Cleaning
A clean air conditioner performs better, but a few habits can further enhance its efficiency and your comfort. After a thorough cleaning, implement these tips to maximize your unit’s performance and save energy.
Adjust Temperature Wisely
Setting your thermostat to an optimal temperature, typically between 75-78°F (24-26°C) during summer, can significantly reduce energy consumption. Avoid drastically lowering the temperature, as this forces the unit to work harder and longer. A slight increase can lead to noticeable savings without sacrificing comfort.
Regular Filter Checks and Light Cleaning
Even with deep cleaning, dust accumulates quickly. Make it a habit to check your air filter monthly. A quick vacuum or rinse can prevent buildup and maintain consistent airflow. This simple, regular maintenance prevents the need for frequent deep cleans and keeps your air quality high.
Utilize Timer and Sleep Modes
Many modern window air conditioners come with programmable timers or “sleep” modes. Use these features to your advantage. Program the unit to turn off or raise the temperature when you’re away or asleep. Sleep mode often gradually increases the temperature overnight, saving energy while you rest comfortably.
Combine with Fans for Enhanced Cooling
Using ceiling fans or oscillating fans in conjunction with your air conditioner can help circulate cool air more effectively throughout the room. This allows you to set your AC thermostat a few degrees higher, reducing its workload and energy use, while still feeling cool due to the evaporative effect of the fan.
> “The secret to long-lasting and efficient cooling isn’t just buying a good unit, it’s about consistent, mindful maintenance. A clean unit is a happy unit, and a happy unit means lower bills and better air.” – Dr. Alex Kim, Environmental Engineer
Frequently Asked Questions
How often should I clean my window AC unit?
Ideally, your window air conditioner’s filter should be cleaned monthly during peak usage, and a deep clean of the entire unit should be performed at least once a year, preferably before the start of the cooling season. This prevents significant dust and mold buildup and maintains optimal performance.
Can I use bleach to clean my window AC?
No, you should never use bleach to clean your window air conditioner. Bleach can corrode metal components, degrade plastic parts, and release harsh fumes that are harmful to breathe. Stick to mild detergents, specialized AC coil cleaners, or a diluted white vinegar solution for cleaning and mold removal.
What if I see mold in my window AC?
If you discover mold, unplug the unit immediately. Clean the affected areas, including the filter, coils, and drain pan, with a solution of white vinegar or a 3% hydrogen peroxide solution. Ensure all parts are thoroughly scrubbed and then allowed to dry completely in a well-ventilated area before reassembly.
How long does a window AC unit take to dry after cleaning?
After cleaning, internal components and the air filter should be allowed to air dry completely. This typically takes several hours, often overnight, depending on humidity levels. Ensuring everything is bone-dry is crucial to prevent mold growth upon reassembly.
Do I need a professional to clean my window AC?
For routine cleaning, most homeowners can safely clean their window air conditioner at home by following detailed instructions. However, if your unit has complex electrical issues, severe internal mold, or mechanical problems, it’s best to consult a professional HVAC technician for thorough inspection and service.
 A sparkling clean window air conditioner unit demonstrating improved airflow and healthy indoor environment
Conclusion
Taking the time to safely clean your window air conditioner at home is a simple yet profoundly impactful act of home maintenance. By consistently removing accumulated dust, grime, and potential mold, you not only ensure your unit operates with maximum efficiency, saving you money on energy bills, but also significantly enhance the quality of the air circulating throughout your living space. This proactive approach extends the lifespan of your appliance, transforming it from a mere cooling device into a reliable source of fresh, healthy air. So, with your window air conditioner now sparkling clean, how will you enjoy the renewed comfort and improved air quality in your home?